INSERT ALTERNATIVE TEXT FOR YOUR HEADER IMAGE HERE

Saturday, July 30, 2011

My Niece Holly's Bridal Shower Cake

OOOOHHHHHHHH I had sooooooo much fun planning and creating this shower and cake for my beautiful niece Holly!!!!  My mother is the best party planner I know and I am so happy that I even inherited one percent of her creativity gene!!!  

Holly's color theme for her wedding was red and white.  The cake was a white cake with strawberry cream filling.  The recipe was from the Wilton website.  It was pretty tasty!!! I used gum paste for the cutouts and they didn't come out very red for as much coloring as I added, but it still turned out pretty!!!

The bride and groom silhouette was from the Wild Card cartridge.  It even looks like Holly and CJ a little!!!!  Super cute!!!


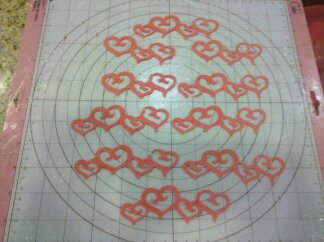
The Doily and the heart borders are from the Cake Basics cartridge!!!


I cut out the flowers from the Wilton gum paste flower making kit!!!  Love this kit.  I've only used the really simple ones.  Some day I will be bold and try the other more intricate flowers.  The only reason I don't try them now is I feel I have no time.....too rushed trying to get everything put together.  Maybe someday I'll just make a cake for the heck of it without all the pressure.  Yea, right!!!  Who am I kidding???


And here is the cake I am most proud of so far.  I think it is just gorgeous, especially for a beginner and novice who has no clue what she is doing.  The green leaf border and white center of the flowers is royal icing which is a little dryer and sturdier than regular icing.  It hardens nicely to keep a nice shape.  It is easy to make.  I got the recipe from the Wilton website.  They are my go to site!!!  I am still not very good at smoothing out the icing, but I'm getting a little bit better from the tips I get from my friends Teresa and Alesha!!!


Here's the invitation that I sent for the shower.  It matches the cake!!!


Here's one of the prize gift bags and goody bag tags I made using my new Cricut Imagine.  It is one of the newer Cricut machines that prints images using an HP printer built inside and then cuts the image just like the Cricut Expression machine.  I love this machine.  It is absolutely amazing!!!!  The "Sweet" image was from the Imagine More cartridge!!  I made little red and white chocolate heart molds for the goody bags!!!


Firetruck Birthday Cake

My good friend Jenna's two son's birthdays are on the same day, but 3 years apart.  So for their 4th and 1st birthday party, we made this adorable firetruck birthday cake!!!!  Whoa!!!  We went through an entire county's egg stock to make this cake!!!! I have not had much experience in baking.  And so far my chocolate filling and frosting have been a complete disaster!!!  I have given up on chocolate until my neighbor Teresa comes over here the next time to supervise.  She swears she has a no fail recipe!!! 

The firetruck, hydrant and hose were all cut with the Paper Dolls for Everyday cartridge.  The red, orange and yellow fondant was precolored and Jenna did a great job adding the black food color to the white fondant. I thought it would come out all marbled looking like before, but it didn't.  Who knows???  With fondant and gumpaste you can only use the gel based food color like you find in any craft store, not the water based like in the grocery store.  I wait for the baking supplies to go on sale and add a 20% off entire purchase coupon on top of it.  The baking supplies hardly ever go on sale, so when they do, you gotta stock up!!!  Every now and again you get super deals that way!!! 

The fondant is still coming out shiny, but when on the cake, it is not noticable.


The font layers were cut from the Birthday Cakes cartridge! (notice the T in the top lefthand corner, I had to go back and add it after cutting the first part, oops!!!)


The flames were cut from the Going Places cartridge.  It was designed on my Gypsy, which is a handheld Cricut design tool that work with all the cartridges.  It was a campfire with log design, but with the Gypsy you can hide certain parts of an image and not cut that portion, so I hid the log part because I just wanted to use the flames as a border for the cake.  Super cool feature!!! 


Ta-da!!!!  It turned out pretty cute, huh???  Jenna then added letter candles to spell out her son's names and a few extra plastic fireman theme decorations.  We just rolled up the extra fondant into balls for the bottom portion of the border!!!  Some people think it looks like M&M's or some other candy, which is not a bad idea, actually!!!  It was such a fun party and the cake even tasted pretty darn good.  Thank goodness!!!  Thanks Jenna for letting me take part in creating these special memories for your family.  I had so much fun working with you on this!!!


Tuesday, May 24, 2011

My Niece's College Graduation Cake

I decided to make a last minute cake the night before my niece's college graduation party.  MISTAKE.... AGAIN!!!!!!!!  I repeat......never, never, never attempt to make a cake without proper preparation and ample time!!!  Unless you are Martha Stewart, which I am not....My bad!!!!  MMMMmmmmmm, look at this yummy chocolate.....I can't wait to dive into that!!!!


I cut the Congrats image out of fondant using the Gypsy Wanderings Digital cartridge that is preloaded on the Gypsy.  It cut perfectly.  I have found the more intricate the design, the more it has a chance of tearing and this one cut nice and clean!!!


Alrighty then..............my first attempt at chocolate icing was a disaster. It turned out lumpy and thick and even though I added other ingredients to try and correct it, it did not help.  I finally caved in and didn't look back.  I just shaped it as best as I could and added the Congrats cutout and rolled some extra white fondant into balls along the perimeter.  Amazingly, I had the courage to take it to the party.  Would you believe people actually ate it and they even said it taste GREAT!!!!  What were they smoking???   All in all, it was another learning experience and I am soooooo proud of my niece for her huge accomplishment and will chalk this adventure up to another day in Cricut Cake Craziness!!!!

 6th Birthday Party Cake

After all this time, my neighbor (one of my besties) was able to learn how to cut out the images using the Cricut Cake.  She is half owner of the machine, but has never had a chance to use it!!!  The BIG DAY finally arrived!!! Yipee!!! Her daughter was turning six and she invisioned a really festive  and colorful cake.  We chose the candies from the Mini Monsters cartridge (again, Mini Monsters...love this cart!!!). We cut 4 different colors to mix and match the layers with precolored fondant.  I haven't used much fondant, but this time they cut out really nice, hardly any tearing.  My only complaint is it comes out sooooo shiney!!!  It may be from the shortening on the cutting mat.  I'm not sure about this.  Maybe I could add some more powdered sugar to it, but the shininess doesn't bother me too much!!!


My neighbor and her other friend finished the cake a few days later.  I wasn't able to help because I had to work.  This whole work thing gets in the way of my life!!!  LOL!!!  Isn't it just adorably cute and festive??? I just love how she used the extra fondant to roll up the little balls around the edge of the cake!!!  I have stolen that idea the next few cakes!!!

Tuesday, April 26, 2011

A Princesses 4th Birthday Cake

I'm getting a little smarter at this whole Cricut Cake thing.  First, I cut out the images about 10 days before the party, because I know how tempermental the gumpaste can be.  The Cricut Cake works wonderfully.  It's the food product that is the problem (or maybe it's me).  My neighbor and I were in kahoots for this project.  We decided to make a large sheet cake for the Cricut Cake images and she had a Wilton Princess Castle Cake kit that you can find at any craft store.  Our, or should I say my crazy plan was to place the castle on top of a really gigantic sheet cake.  That plan was averted the night before the party when parts of our tiered cakes were started to cave in on themselves.  Even a 2 layered round cake with all the filling and frosting is surprisingly heavy!!!  So, we separated the two cakes.  It turned out beautiful.  I really appreciated all the hard work my friend put in to help me make this cake a success.  Next is her daughters birthday party cake!!!


Supplies, supplies, supplies........it gets pretty messy and I used the ENTIRE kitchen and dining room with all my stuff spread out!!!  My hubby just turns his head!!!  Hee-hee!!!!  So much fun!!!


Whoo hoo.......first cut a success!!!!  Gumpaste using the Cake Basics cartridge!!!  Will use the crowns as borders around the side of the sheet cake.  My gumpaste is still turning out marbled.  Any suggestions???


All designs below cut out with gumpaste from the Birthday Cakes cartridge.  I used the princess for the invitations too.  I think they all turned out nice.  Nothing tore during these cuttings.  Lucky!!!!!!


The swirls and crowns were from Cake Basics cartridge.  Nice!!!


I broke down and bought the Wilton Gumpaste Flower Making kit.  It came in handy!!!  These were used for the castle!!!


My neighbors and my first attempt at royal icing to make leaves, flowers and borders.  Great job for our first time!!!


And there it is!!!  MAGICAL!!!!


It was a fabulous party!!!


This was the moment she looked forward to all day!!!!


At this moment she melted my heart......She grabbed my neck and said, "You're the best Mommy ever, I love you sooooo much!"  All the stress from planning and creating this day was gone!!!


Happy Thanksgiving 2010

My second Cricut Cake project I thought would be a breeze......NOT!!!!!!!!
I really thought I did a great job on my first project, the Halloween cupcakes and cookies. I thought I would do an equally good job on a Thanksgiving cake I wanted to make for my family.  I don't know what happened exactly.  All I do know is that this project was a disaster from the start.  Maybe I shouldn't have waited until the evening before Thanksgiving to start, but now I know and I will start cutting out images at least a week before I plan on making the cake and just store them in the freezer!!!

I made a spice cake and covered it with buttercream frosting and then rolled out what was supposed to be orange fondant.  It turned out a little pinkish or salmon color and why in the world does it look marbled.  UGH.  I'm still trying to figure this one out.


I sort of successfully covered the cake with the fondant.  It was a bit lumpy and the color is marbled, but not tooooo bad for my first time.  The cut out images hide a lot of the flaws.......purposefully of course!!!!!  I cut out the Grateful phrase from from the Gypsy Wanderings preloaded cartridge on the Gypsy using precolored fondant and the leaves from the Stretch Your Imagination cartridge with precolored fondant.  The dark brown leaves were cut using the Cricut Cake frosting sheets. I learned the leaves were too detailed and kept tearing over and over.  A lot of "surgery" was used to get them half way looking decent.  This cake is just plain ugly and no one in my family took a bite.  I don't blame them.  It was a learning experience.  Hopefully I don't give all this up!!!  I'm invested too much now!!!

At least my turkey turned out FABULOUS!!!!!!!  I used Emeril's brine recipe!!!  TO DIE FOR!!!  It was a wonderful day and great dinner with family!!!